Showing posts with label breads. Show all posts

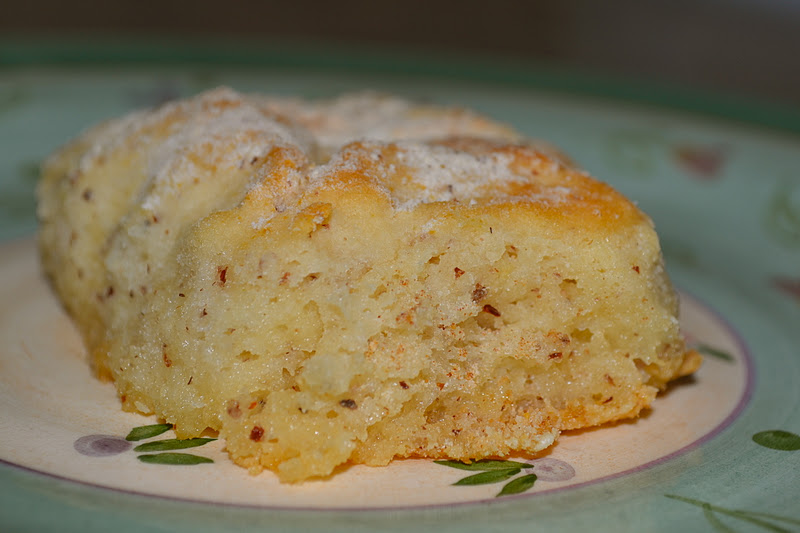
Gluten Free 7UP Biscuits


These soft biscuits are delicious and so simple.  You only need 4 ingredients including a gluten free baking mix.  I used Pamela's but you could use the gluten free baking mix of your choice.  We like them smothered with honey or homemade jam.

Gluten Free 7UP Biscuits

2 cups Pamela's gluten free Baking and Pancake Mix
1/2 cup sour cream
1/2 cup 7-up
1/4 cup butter

Preheat oven to 450 degrees Fahrenheit. Cut sour cream into Pamela's mix and stir in 7UP until just combined.  Dough will be sticky.  Flour your work surface with additional Pamela's mix and pat dough out to 3/4 inch thick.  Place butter in a 9 inch square (or round) pan and place in the preheated oven to melt the butter.  Cut into nine 2 inch circles (I used a drinking glass to cut them).  Remove pan with melted butter from the oven and place cut biscuit dough into the pan.  Return pan to the oven and bake for 15 minutes.  Serve warm with topping of your choice.

Cinnamon Raisin Scones for the Gluten-Free Ratio Rally

Scones, a most delightful breakfast treat - especially while watching the The Royal Wedding of William and Kate!  How perfect that scones happen to be this months challenge for the gluten free ratio rally.  I remember learning about pound cake as a teenager in home-ec class: a pound of flour, a pound of butter, a pound of sugar; or a 1:1:1 ratio.  That's what the gluten free ratio is all about - using weight to figuring out gluten free baking/cooking ratios in hopes of creating an end result of perfect gluten free deliciousness.  Lauren, over at Celiac Teen is our host this month.  Head over to her blog for the complete list of scrumptious gluten free scones created in this months rally.

Scones, at least the traditional English kind, were a first for me.  Not only had I never made them, but I'd never eaten one before this challenge.  Yes, I'd seen them in the glass cases through coffee shop windows, but since I don't drink coffee or tea, I never really thought to eat scones. 
For many of the ratio rally challenges we will be using Michael Ruhlman's book Ratio and adapting as needed to make things gluten free.  Ruhlman does not have a scone ratio so we (a collection of very talented gluten free bloggers) did a lot of experimenting to find the ratio that works best for us.

I had success with a ratio of 3 parts flour/ 1 part liquid/ 1 part egg/ 1 part fat.  I started out by weighing my egg.  I usually use large eggs, but since my local store was practically giving away medium size eggs for Easter, that's what I had on hand.  Due to the size of my egg I measured everything in grams so that I would be more accurate.  The nice thing about using ratios is that you can easily adapt the recipe swapping out ingredients and making more or less depending on your pantry!


 Gluten Free Cinnamon Raisin Scones

50 grams sweet rice flour
100 grams gluten free flour mix
2 Tablespoons sugar
2 teaspoons baking powder
1/2 teaspoon cinnamon
1/4 teaspoon salt
50 grams milk
50 grams egg (my egg was 49 grams. I added water to make it 50)
50 grams cold butter, cut into small pieces
70 grams raisins (about 1/2 cup raisins)

Combine flours, sugar, baking powder, cinnamon and salt in a large mixing bowl.  Add butter and mix on low until flour mixture looks like course meal, 1-2 minutes.  Place flour mixture into a small bowl and stick in the freezer to keep cold while you beat the egg.  Beat the egg in the same mixing bowl that the flour was in. (you don't need to clean it).  Mix on medium for 3-4 minutes or until the egg is very light and foamy.  Turn off the mixer and add the milk, raisins and the flour mixture from the freezer.  Mix on medium low just until mixture comes together (about 30 seconds).  Scoop dough onto a piece of parchment paper or silicone baking mat and pat down to a 3/4 inch thick disk.
Cut out the scones with a small cookie cutter or use a pizza cutter to cut it into 6- 8 wedges.  I cut out 5 triangles then pressed the dough scraps together into a small disk and got 2 more triangles plus a free form circle with the last of the scraps.

Place cut scones on a baking sheet and sprinkle with sugar crystals.  At this point I covered with plastic wrap and refrigerated overnight so I could bake them fresh for breakfast.  If you don't want to wait, go ahead.  Skip the refrigerator, bake and enjoy!


Baking instructions:  Preheat oven to 425 degrees Fahrenheit.  Place baking sheet into preheated oven and turn down the temperature to 375 degrees. Bake for 20-25 minutes. (20 minutes in my oven for 7 scones).

If desired, drizzle a simple glaze of powdered sugar mixed with a little milk over each scone.

1st Day of Christmas Treats: Gluten Free Pumpkin Bread

Sorry neighbors, this bread was so moist and delicious that I nibbled away the whole loaf and left none for you.  Next time I might cut the sugar to 3/4 cup, as it was a bit on the sweet side.  I'll be making this one again for sure!

Gluten Free Pumpkin Bread

1 cup sugar
2 eggs
1/4 cup water
1/3 cup oil
1 cup pumpkin puree
1 3/4 cup gluten free flour mix
2 teaspoons pumpkin pie spice
1 teaspoon baking soda
3/4 teaspoon xanthum gum
3/4 teaspoon salt
1/2 teaspoon baking powder

Preheat oven to 350 degrees Fahrenheit.  Combine sugar, eggs, water, oil and pumpkin in a mixing bowl and blend well.  Sift remaining ingredients into the mixing bowl and stir until well blended.  Do not over beat.  Pour batter into a 4 x 8 inch loaf pan that has been sprayed with cooking spray.  Bake for 50 - 60 minutes or until toothpick inserted into the center comes out clean.  Cool 10 minutes before removing from the pan.  It's best if you can wait until the next day to eat it so the flavors have time to mingle.  Yum!

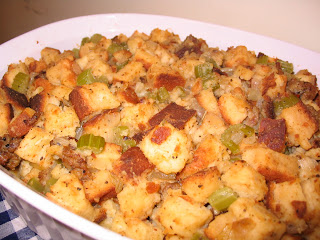
Gluten Free Stuffing


I was never a huge stuffing fan, but 2 years ago I decided to try making it gluten free and now it is one of my favorite foods for Thanksgiving.  This recipe comes from my mother-in-law and it is absolutely delicious.  I've adapted it to be gluten free.

Gluten Free Stuffing

1/2 cup butter
1 cup chopped onion
1 1/2 cups chopped celery
8 cups cubed gluten free bread (I use bread that's a few days old)
1/2 - 1 pound gluten free sausage (depending on your taste)
2 teaspoons poultry seasoning
1 teaspoon salt
1/2 teaspoon pepper
chicken broth or water as needed

Preheat oven to 325 degrees Fahrenheit. Brown and crumble sausage over medium heat.  When fully cooked, remove sausage from pan and add butter, onion and celery.  If there is a lot of grease from the sausage you can reduce the amount of butter.  Cook onions and celery until onion is transparent (about 10 minutes).  Mix in the remaining ingredients, including sausage and toss lightly.  Taste and adjust seasoning as needed.  If stuffing is on the dry side, add chicken broth or water a few tablespoons at a time until it is to your liking.  You don't want it too wet as gluten free bread is prone to sogginess and easily disintegrates.  Place in greased 2 quart casserole dish and sprinkle a couple more Tablespoons of liquid over the top.  Place lid or foil over the stuffing and bake for 45 minutes.

Gluten Free Zucchini Muffins

I'm down to my last zucchini and have been spreading it out all week. Sunday I made chocolate zucchini cake and today I made these yummy muffins. The original recipe was actually for Carrot Muffins, but I subbed in grated zucchini and added raisins. They turned out delicious - moist and soft with just enough spice. They'd be good with a little glaze if you make them for a special occasion!

Zucchini Muffins - gluten free

2 cups gluten free flour mix
1/2 cup brown sugar
1 Tablespoon baking powder
1 teaspoon baking soda
3/4 teaspoon xanthum gum
2 teaspoons cinnamon
1/2 teaspoon nutmeg
1/4 teaspoon salt
1 cup grated zucchini
1/2 cup sweetened shredded coconut
1/2 cup raisins (optional)
1/2 cups milk
1/3 cup oil
2 eggs
1 teaspoon vanilla

Heat oven to 350 degrees and place muffin papers in muffin tin (makes 18).

Combine dry ingredients (first 8 ingredients listed in recipe) in a large mixing bowl. Add zucchini, coconut and raisins and stir to coat evenly. In a small bowl combine milk and oil. Beat in the eggs and vanilla. Add liquids to flour mixture and stir until just blended.

Fill muffin pans 2/3 full and bake 20-25 minutes (I baked for 22 minutes) or until light golden brown. They are delicious right from the oven, but taste just as good when cooled and reheated for 20 seconds in the microwave.

Breads from Anna

When we got home after adopting our baby we had several friends offer to bring us dinner while we got settled into a routine with our little one. One of these fabulous dinner introduced me to my first taste of Breads from Anna. My friend made us the pumpkin read using the Breads from Anna mix and also an apple pancake and muffin mix to make later. I've seen Breads from Anna mixes before, but they seemed a bit expensive for someone who doesn't mind baking from scratch (that'd be me), so I always passed them over.

The pumpkin bread was delicious and the texture was moist and delicate. I ate about half the loaf by myself! Always on the lookout for ideas and hints I thought I'd check out the ingredients on the package. I almost fainted dead away when I saw BEAN FLOUR listed. Seriously??!!! How could I have eaten so much without noticing that chalking bean aftertaste? Anna is really on to something and I've been inspired to pick up some bean flour and do a little bit of experimenting (I'll let you know what I come up with). The apple muffins were delicious too, and one mix made 18 muffins. Maybe I'll just pick up some more of Anna's mixes instead of that flour...

Gluten Free Multi-Flour Tortillas

Recently I was asked what I eat to get enough fiber in my diet.  As you may have guessed, gluten free products are usually lacking in fiber.  Here are a couple of things that I do to get the recommended 25-35 grams a day.  When it's time for a snack I usually stick to fruits, veggies, almonds, and popcorn.  I try to use brown rice instead of white and I eat beans at least once a day - usually with a quesadilla and salsa at lunchtime.  I usually use corn tortillas to make my quesadillas, but after adapting a recipe for gluten free rice flour tortillas by Bette Hagman, I might just switch over to using these - they've each got 5 grams of fiber and 160 calories.  Plus they're easy to make and taste great!  

GF Multi-Flour Tortillas

1 Cup Brown Rice Flour
1/2 cup Buckwheat Flour
1/2 cup Soy Flour
1 1/2 teaspoons xanthum gum
2 teaspoons sugar
1 teaspoon salt
2 teaspoons milk powder
1 cup warm water

Put all of the ingredients into a mixing bowl and beat on medium for 1 minute.  Divide dough into 6 equal parts.  Dust work surface with corn starch and roll out each piece very thin to form a 12" circle (unless you're a superstar roller, expect your circle to be a bit jagged around the edges like the picture above).  If you are going to roll them all out before cooking them, use plastic wrap to separate each tortilla so they don't stick together .  Otherwise, cook the first one while rolling out the next, continuing until you've done all 6.

To Cook:  Heat a large griddle to medium-hot and cook each tortilla 1-2 minutes per side. Serve immediately or store in an air-tight container in the refrigerator.  These tortillas reheat nicely in the microwave.

Buen Provecho!

Gluten Free Orange Cranberry Muffins

I've been in the mood for orange cranberry muffins and when I remembered that I had cranberries in the freezer I decided it was time to feed my craving. I adapted a recipe from Annalise Roberts Gluten-Free Baking Classics cookbook and they are probably the best muffins I've ever made (although my gluten free Loaded Pumpkin Chocolate Chip Muffins are pretty close!) These are a new family favorite!

Gluten Free Orange Cranberry Muffins - makes 12 muffins

1/4 cup butter, room temperature
1/4 cup nonfat plain yogurt
3/4 cup sugar
2 eggs
1 1/2 cups Gluten Free Flour Blend
1 1/2 teaspoons baking powder
1/2 teaspoons xanthum gum
1/4 teaspoons salt
1/4 teaspoon lemon extract
3/4 - 1 cup coarsely chopped fresh or frozen cranberries
Grated rind from 1 large orange
1/2 cup freshly squeezed orange juice (juice the orange after you grate the rind)

Preheat oven to 350 degrees and line a muffin tin with 12 muffin papers. Cream butter, yogurt, and sugar until light and fluffy. Beat in the eggs one at a time. Mix in the rest of the ingredients except for the cranberries until just blended. Fold in the cranberries. Pour batter into prepared muffin tin filling about 3/4 of the way full. Bake at 350 degrees for 25 minutes. Cool completely before wrapping and storing in the refrigerator. They also freeze well if you don't plan on eating them within a few days.

TIP: When fresh cranberries come on sale during the holidays pick up an extra bag to freeze for later use. They freeze really well and you can freeze them right in the bag they come in.

French Toast

Happy Easter!  French Toast used to be one of my favorite breakfast, but I got out of the habit of making it when I had to go on a gluten free diet.  (I like corn tortillas more than most gluten free bread, so I don't have bread very often.)  When I woke up this morning I remembered that I had bread in the freezer made from the Whole Foods brand 365 gluten free bread mix (it's practically identical to the Gluten Free Pantry favorite sandwich bread mix, tastes the same but cost a little less.  Both of these are favorites when I'm making bread from a mix.)  The Easter Bunny left a carton of eggs in the refrigerator that we hadn't colored yet so we decided French Toast would be the perfect beginning to a beautiful Easter Sunday.  French Toast is so easy to make.  Here's how:

Easy Gluten Free French Toast
(makes 6 pieces)
1 egg
1/3 - 1/2 cup milk (depending on how egg-y you like it.)
1/8-1/4 teaspoon cinnamon 
dash of nutmeg (optional)
1/4 teaspoon vanilla

Heat skillet to medium.  Combine ingredients in shallow dish that fits a slice of bread - I usually use a dinner plate that has steep edges.  Spray skillet with cooking spray, dip both sides of each bread slice in egg mixture and place on hot skillet.  Continue this process until skillet is covered.  Turn bread over when its light brown (about 2 minutes) and cook the other side until it is brown.  Continue process until all of the egg mixture is gone (about 6 slices). Serve immediately with syrup or your favorite toppings.


Gluten Free Apple Cider Donuts

This recipe was taken from one of my favorite gluten free cookbook authors, Annalise Roberts.  It is posted in its entirety on her website .  I followed her recipe exactly and ended up with these delicious donuts.  My husband gave me the highest compliment when after taking his first bite he asked if they were gluten free!

I used a wide mouth glass for the donut shape and a shot glass for the donut holes.  Since we don't drink alcohol it was nice to see the shot glass finally get some use!

Watch the temperature of your oil while making these.  If you add too many donuts the temperature drops and they don't cook correctly.
We covered ours in cinnamon sugar, but a nice apple cider glaze would be yummy too.  I think I'll try that next time.

Crock Pot Chipotle Chili and Skillet Cornbread


I think I've found my new favorite meal! I came across the chili recipe in the Jan/Feb issue of Midwest Living. My husband and I both like the smokey flavor of chipotle and I had most of the ingredients on hand so it was a bit of a no brainer to make it for dinner. The original recipe calls for 1 1/2 pounds ground beef, but I only had 1/2 pound so I substituted an extra can of beans and doubled the hominy to take its place. I also used chipotle seasoning instead of chipotle peppers in adobo sauce - it's a personal preference.

After getting the chili into the crockpot I started thinking of what to serve with it. I love cornbread and have a decent gluten free one already posted on my blog, but unless you eat it right from the oven it's a bit on the dry side and doesn't re-heat very well (must eat with milk to choke it down although the flavor is nice). I was thinking of ways to add some moisture (sour cream, applesauce, etc) when I remembered that I had some creamed corn in the pantry. I thought creamed corn might help make my cornbread moist, and after doing some online searches realized that others shared my same line of thinking - there were lots of recipes online for cornbread using creamed corn. I used this one because it looked like I could easily make it gluten free. Here are the recipes exactly how I made them. They are so yummy and the cornbread is my new favorite!

Chipotle Chili

  • 1/2 pound ground beef
  • 2 cups water
  • 1 14 oz can diced tomatoes
  • 1 14 oz can mexican stewed tomatoes
  • 1 15-oz. can black beans, rinsed and drained
  • 1 15-oz. can kidney beans, rinsed and drained
  • 1 30-oz. can golden hominy, rinsed and drained
  • 2 cups loose-pack frozen diced hash brown potatoes with onions and peppers
  • 1 teaspoon beef flavored better than bouillon
  • 2 tsp. chili powder
  • 1 teaspoon garlic powder
  • 1 tsp. dried oregano, crushed
  • 1 tsp. ground cumin
  • 1/2 teaspoon chipotle seasoning

Brown hamburger and place in slow cooker with all of the ingredients. Cook on low for 7 to 8 hours. Serve with sour cream, chopped avocado and shredded cheddar cheese if desired.


Skillet Corn bread
  • 1 cup yellow cornmeal
  • 1/2 cup gluten free flour blend
  • 3 tablespoons sugar
  • 2 teaspoons baking powder
  • 3/4 teaspoon salt
  • 1/4 teaspoon xanthum gum
  • 1 can creamed corn
  • 1/4 cup (1/2 stick) unsalted butter, melted, cooled slightly
  • 1 large egg, beaten to blend

  • preheat oven to 400°F. Whisk cornmeal, gf flour, sugar, baking powder and salt and xanthum gum in large bowl to blend. Add creamed corn, butter and egg. Stir just until blended. Spoon batter into an 8 inch cast iron skillet.
Bake until edges begin to pull away from pan sides and tester inserted into center comes out clean, 25-30 minutes. Serve warm with butter and honey.


Daring Bakers Challenge: Gluten Free Crackers and Dip

I would have never thought of making homemade crackers if it hadn't been the DB challenge, but I am so glad I did.  These crackers almost taste like wheat thins (one of my favorite crackers that I can no longer eat) and it only took 5 minutes to mix them, roll them and stick them in the oven.  I will be making these again and I'll probably play with the recipe a little to see if I can get them a little closer to the wheat thin flavor I remember -without the wheat. Either way I am happy to have crackers!
Salsa verde is the dip I chose not only because it's gluten free and vegetarian, but it's also one of our favorites.  I don't use a specific recipe - I go by taste.  My friend Concha, who is from Puebla Mexico, taught me how to make this.  I'll try to write down the recipe the next time I make it.

Gluten Free Crackers

1/4 cup gf flour blend
1/4 cup millet flour
1/4 cup minus 1 teaspoon water
1 Tablespoon oil
1 teaspoon honey
1/8 teaspoon salt
salt for sprinkling

Mix until combined.  roll out paper thin between 2 sheets of parchment paper. Lift off top parchment sheet use pizza cutter to cut into desired size crackers. Mist dough with olive oil and sprinkle with salt or other seasoning.  (you don't need to separate them, they will bake into crackers and any still connected are easily broken apart.)  Slide parchment paper with dough onto cookie sheet and bake for 20-25 minutes at 350 degrees.

DB 1st Challenge - Blackberry Danish Braid

When they say challenge, they ain't kidding! I about bowed out when I saw that we were making a Danish Braid, but being on a gluten free diet has really helped me to come out of my comfort zone and embrace baking challenges. I find it so rewarding when my baking is met with success and when it's not, instead of feeling despair I'm met with a stronger determination to try again. It must be that stubborn streak in me coming out of hiding!

I found this challenge to be immensely rewarding and my fear of pastry dough has even dwindled a bit. My Danish braid was flaky and delicious - an overall success. My only disappointment was that the dough barely rose, but after cooking gluten free for over three years I wasn't really expecting it to! I'm anxious to check out some of the other gluten free daring bakers to see how they fared and what tips I can glean from their experience.

The recipe we used for this challenge comes from Sherry Yard’s "The Secrets of Baking". Everyone doing the challenge was to strictly follow the recipe for the Danish dough and than fill the braid with any topping of your choosing as long as you make it yourself. The only exception is for those on alternate diets who can make slight modifications to accommodate their diet. I swapped out the flour cup for cup with a gluten free flour blend and added 1 tsp xanthum gum. Otherwise I followed the recipe as written.

DANISH DOUGH - Gluten Free
Makes 2-1/2 pounds dough
Ingredients for the dough (Detrempe)
1 ounce fresh yeast or 1 tablespoon active dry yeast
1/2 cup whole milk
1/3 cup sugar
Zest of 1 orange, finely grated
3/4 teaspoon ground cardamom or pumpkin pie spice
1-1/2 teaspoons vanilla extract
1/2 vanilla bean, split and scraped
2 large eggs, chilled
1/4 cup fresh orange juice
3-1/4 cups gluten free flour blend
1 teaspoon salt
2 teaspoons xanthum gum
sweet rice flour for dusting sticky dough

Ingredients for the butter block (Beurrage)
1/2 pound (2 sticks) cold unsalted butter
1/4 cup gluten free flour blend

DOUGH: Combine yeast and milk in the bowl of a mixer fitted with the paddle attachment and mix on low speed. Slowly add sugar, orange zest, cardamom, vanilla extract, vanilla seeds, eggs, and orange juice. Mix well. Change to the dough hook and add the salt and xanthum gum with the flour, 1 cup at a time, increasing speed to medium as the flour is incorporated. Knead the dough for about 5 minutes, or until smooth. You may need to add a little more flour if it is sticky. Transfer dough to a lightly floured baking sheet and cover with plastic wrap. Refrigerate for 30 minutes.

BUTTER BLOCK: 1. Combine butter and flour in the bowl of a mixer fitted with a paddle attachment and beat on medium speed for 1 minute. Scrape down the sides of the bowl and the paddle and then beat for 1 minute more, or until smooth and lump free. Set aside at room temperature.

2. After the detrempe has chilled 30 minutes, turn it out onto a lightly floured surface. Roll the dough into a rectangle approximately 18 x 13 inches and ¼ inch thick. The dough may be sticky, so keep dusting it lightly with flour. Spread the butter evenly over the center and right thirds of the dough. Fold the left edge of the detrempe to the right, covering half of the butter. Fold the right third of the rectangle over the center third. The first turn has now been completed. Mark the dough by poking it with your finger to keep track of your turns, or use a sticky and keep a tally. Place the dough on a baking sheet, wrap it in plastic wrap, and refrigerate for 30 minutes.

3. Place the dough lengthwise on a floured work surface. The open ends should be to your right and left. Roll the dough into another approximately 13 x 18 inch, ¼-inch-thick rectangle. Again, fold the left third of the rectangle over the center third and the right third over the center third. No additional butter will be added as it is already in the dough. The second turn has now been completed. Refrigerate the dough for 30 minutes.

4. Roll out, turn, and refrigerate the dough two more times, for a total of four single turns. Make sure you are keeping track of your turns. Refrigerate the dough after the final turn for at least 5 hours or overnight. The Danish dough is now ready to be used. If you will not be using the dough within 24 hours, freeze it. To do this, roll the dough out to about 1 inch in thickness, wrap tightly in plastic wrap, and freeze. Defrost the dough slowly in the refrigerator for easiest handling. Danish dough will keep in the freezer for up to 1 month.

Blackberry Topping 1/2 cup water 6 tablespoons sugar 4 1/2-pint containers blackberries, divided

Stir 1/2 cup water and sugar in heavy large saucepan. Add half of berries and bring to boil. Reduce heat and simmer until syrup thickens, mashing berries with back of fork, about 12 minutes. Pour into medium bowl; gently stir in remaining berries. Cover and chill until cold, at least 3 hours and up to 1 day.

DANISH BRAID Makes enough for 2 large braids Ingredients 1 recipe Danish Dough 2 cups filling, jam, or preserves

For the egg wash: 1 large egg, plus 1 large egg yolk

1. Line a baking sheet with a silicone mat or parchment paper. On a lightly floured surface, roll the Danish Dough into a 15 x 20-inch rectangle, ¼ inch thick. If the dough seems elastic and shrinks back when rolled, let it rest for a few minutes, then roll again. Place the dough on the baking sheet.

2. Along one long side of the pastry make parallel, 5-inch-long cuts with a knife or rolling pastry wheel, each about 1 inch apart. Repeat on the opposite side, making sure to line up the cuts with those you’ve already made.

3. Spoon the filling you’ve chosen to fill your braid down the center of the rectangle. Starting with the top and bottom “flaps”, fold the top flap down over the filling to cover. Next, fold the bottom “flap” up to cover filling. This helps keep the braid neat and helps to hold in the filling. Now begin folding the cut side strips of dough over the filling, alternating first left, then right, left, right, until finished. Trim any excess dough and tuck in the ends.

Egg Wash Whisk together the whole egg and yolk in a bowl and with a pastry brush, lightly coat the braid.

Proofing and Baking

1. Spray cooking oil (Pam…) onto a piece of plastic wrap, and place over the braid. Proof at room temperature or, if possible, in a controlled 90 degree F environment for about 2 hours, or until doubled in volume and light to the touch.

2. Near the end of proofing, preheat oven to 400 degrees F. Position a rack in the center of the oven.

3. Bake for 10 minutes, then rotate the pan so that the side of the braid previously in the back of the oven is now in the front. Lower the oven temperature to 350 degrees F, and bake about 15-20 minutes more, or until golden brown. Cool and serve the braid either still warm from the oven or at room temperature. The cooled braid can be wrapped airtight and stored in the refrigerator for up to 2 days, or freeze for 1 month.

Gluten Free Loaded Pumpkin Chocolate Chip Muffins

This weekend we got together with some friends for homemade pizza and root beer floats. I was happy to take my own mini gluten free crust (Kinnikinnick) until my friend pulled from her oven the most gorgeous gluten laden crusts I've ever seen. I didn't know you could make such beautiful homemade crusts and the smell, ohhhh...it was heaven! Suddenly my gluten free crust wasn't so appealing.

I came home with the need to bake something wonderful- something deliciously warm and nostalgic and that tasted like the gluten baked goods I remember. I chose one of my favorite no fail recipes - Gluten Free Loaded Pumpkin Muffins.

This recipe is a conglomerate of several recipes that I tweaked to come up with these delicious pillows of pumpkin bliss. The coconut milk is the secret and I've had the best results with the Thai Kitchen brand- not lite! I like them best with chocolate chips, shredded coconut and chopped pecans, but there great on there own or with just one or two of the add ins.

I think you could probably take out the xanthan gum and use all-purpose flour with great result for a gluten version. Let me know how they turn out.

1-3/4 cups gluten free flour blend (I use brown rice flour, potato starch, & tapioca starch)
1 cup packed brown sugar
1 teaspoon baking soda
1 teaspoon xanthan or guar gum
1/2 teaspoon baking powder
1/2 teaspoon salt
2 teaspoons pumpkin pie spice
1 cup pumpkin puree
1/3 cup vegetable oil
2 large eggs
1/3 cup coconut milk
1 teaspoon vanilla
1/3 cup flaked coconut
1/3 cup chopped pecans
1/3 cup chocolate chips

Preheat oven to 350 degrees F. Spray with cooking spray one 8x4 inch loaf pan or muffin tin.

In a large bowl, stir together the flour, brown sugar, xanthan gum, baking soda, baking powder, salt, and pumpkin pie spice. Add the pumpkin puree, oil, eggs, coconut milk, and vanilla and mix until well blended. Fold in the shredded coconut, chopped pecans, and chocolate chips. Pour the batter into prepared pan or muffin tin.

Bake for 45-55 minutes for loaf and 20-25 minutes for muffins or until a toothpick inserted in the center comes out clean. Remove from oven and cool slightly before removing from pan. Remove from muffin tin immediately. Cool completely before storing. Cover tightly and store in refrigerator up to 5 days. These freeze well.

GF Cornbread

There's nothing like a warm piece of cornbread smothered in butter and honey! After trying a few gluten free recipes with okay results I came across one that I love. I'll post a picture the next time I make it.

Gluten free Cornbread

3/4 cup GF flour mix
1/2 tsp guar gum
3 tsp. GF baking powder
1 tsp. baking soda
1 3/4 cup corn meal
1/4 cup sugar
3/4 tsp salt
3 tbls. melted butter
1/4 cup honey
1 egg
1 cup buttermilk or sour milk

Stir flour, baking powder, baking soda, cornmeal, sugar and salt together in large bowl. Make a well and add melted butter, honey, egg and buttermilk. Stir with a fork until flour is just moistened. Pour into nine inch pan and bake at 425 degrees until golden brown or a toothpick inserted in center comes out clean, about 18 -25 minutes.

Homemade Hamburger Buns!

It'd been a couple of years since I'd had a hamburger bun so when I found this recipe I was anxious to give it a try.
As you can see the buns turned out so beautifully that Shane couldn't help being a little overzealous with the toppings. The buns had a great flavor, but they did get soggy quickly and crumbled a bit (squishing everything together to try to fit this monstrous Burger into his mouth didn't help!). It was fun to have a burger with a bun and I made extra for the freezer. I'm looking forward to sloppy joes or maybe a BBQ beef sandwich. mmm...